Ethereum Stalls Below $2,387 as Moving Averages Compress
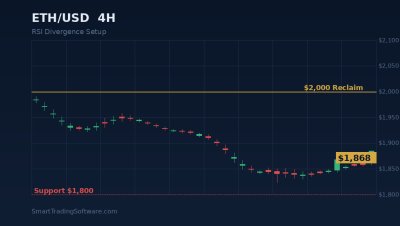
Ethereum is consolidating in a tight $2,350-$2,415 range as of mid-May 2026, with the spot price hovering near $2,387. That number matters: it sits directly above the convergence of the 50-day moving average at $2,361 and the 200-day moving average at $2,367 - a compression band of less than $6 that traders rarely see on the daily chart. A confirmed daily close above this cluster would flip both averages from overhead resistance into dynamic support and open a measured-move path toward the $2,500 psychological zone, and ultimately the $2,750 region highlighted by several momentum models.
The supporting backdrop is constructive. Whale wallets have absorbed roughly 140,000 ETH worth approximately $322 million over a recent 96-hour window, a historically reliable accumulation footprint. Daily RSI sits at 60 - bullish but not overheated - while MACD remains positive on the daily timeframe. With the Glamsterdam hard fork penciled in for June 2026 and expected to roughly triple L1 throughput, the fundamental tailwind aligns neatly with the technical setup. The flip-side risk is also defined: a rejection at $2,387 exposes immediate support at $2,304, with $2,211 and $2,108 as deeper failure points.
Trading the $2,387 Break With a Renko Strategy
Range compression of this magnitude inside a constructive trend is one of the cleanest conditions for a Renko-based breakout strategy. Unlike time-based candles, Renko bricks only print when price travels a fixed distance, which filters the choppy hourly noise that typically traps breakout traders inside compressed bands like the one Ethereum is sitting in right now. The brick stream stays flat through accumulation and then prints a sharp directional sequence when the move actually fires.
Pairing this with an automated execution layer such as the Renko Bot removes the discretionary problem of choosing exactly when the breakout has been confirmed. The bot waits for a defined number of same-color bricks in the breakout direction, then enters with stop-loss and take-profit ratios that the trader configures in advance. For a $2,387 setup, the natural brick size is 0.25%-0.30% of price, or roughly $6-$7 per brick, which mirrors the size of the MA convergence band itself.
Suggested Parameters for the ETH/USD Setup
A trader configuring the Renko Bot for this specific scenario could use the following baseline, adjusting position size to account.
- Brick size: $7 (approximately 0.30% of $2,387)
- Entry trigger: 3 consecutive bullish bricks closing above $2,395
- Stop-loss: $2,355 (below the 50-day MA and the lower edge of compression)
- Take-profit 1: $2,500 - partial close, 60% of position
- Take-profit 2: $2,620 - trailing stop after TP1 hits
- Take-profit 3: $2,750 - remaining 40% of the position
This produces an initial risk-to-reward of roughly 1:2.8 to TP1 and closer to 1:9 if price extends to the $2,750 swing target. The Renko filter means the bot will not chase a fakeout - if price prints two bullish bricks and then reverses back below the trigger zone, no trade is opened.
Why Automate This Particular Setup
Convergence-break setups punish hesitation more than almost any other technical pattern. The actual breakout candle on the daily timeframe usually closes well above the trigger zone, meaning manual traders who wait for "confirmation" end up entering 1.5%-2% later than the system would. On a target like $2,500, late entry collapses the risk-to-reward profile from 1:2.8 to closer to 1:1.6 - still profitable on paper, but no longer worth the drawdown the position will inevitably take during the chop that follows the initial impulse.
Crypto markets are also 24/7, and Ethereum's largest single-day moves over the last cycle have routinely printed between 02:00 and 06:00 UTC. Discretionary traders sitting in U.S. or European time zones simply miss these windows. An automated approach handles this asymmetry by design.
For traders who prefer to validate the strategy before deploying live capital, the Indicators Tester can replay the Renko signal against historical ETH/USD data, letting you see how the brick-count threshold and stop placement would have performed across previous MA convergence events on Ethereum and other large-cap pairs.
Key Levels to Watch This Week
Three levels define how this trade unfolds.
$2,387 - primary trigger. Resistance confluence of recent swing highs, the upper edge of the consolidation range, and the round-number magnet just above the MA cluster. A clean daily close above this number is the green light.
$2,304 - bull-bear pivot. The most immediate horizontal support and the level the recent accumulation rests on. A break below $2,304 cancels the bullish thesis and would likely accelerate down to $2,211 next.
$2,500 - first target. The psychological round number, the path of least resistance after $2,387 fails, and the level where short-term momentum chasers will start booking gains. Expect at least one rejection here before continuation toward $2,750.
Volume confirmation matters too - a daily close above $2,387 on volume meaningfully above the 20-day average is more reliable than a thin breakout on light flow, which is exactly the kind of fakeout the Renko filter is designed to reject.
Getting Started With the Setup
For traders ready to deploy the strategy on MetaTrader 4 or 5, the workflow is straightforward.
- Acquire and install the Renko Bot on your MT4 or MT5 platform.
- Apply it to the ETH/USD chart with the brick size set to $7 and the entry confirmation threshold at 3 bricks.
- Configure the stop-loss at $2,355 and take-profit ladder at $2,500, $2,620, and $2,750.
- For an additional confirmation layer, add the RSI Divergence Bot as a confluence filter - it will block entries when daily RSI shows bearish divergence against price, a useful safety net in extended consolidations.
- Run the combined setup on a demo account for at least one full breakout cycle before risking real capital.
The next 5-7 sessions should resolve the compression in one direction or the other. If you would like help calibrating brick size or stop placement for your specific account size and risk tolerance, our analysts are happy to walk through the configuration - reach out via the contact page and we will get back to you within one business day.