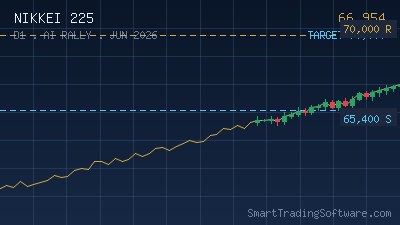
Nikkei 225 Slips Below 61,800: A Reclaim Setup Worth Watching
The Nikkei 225 is trading at 61,409 after pulling back roughly 1.99% in the last session, slipping just under the 61,800 short-term pivot that bulls had been defending for most of the month. The recent local high at 63,091 was printed on May 7, and the chart now shows a classic post-rally cool-off, with price compressing inside a 61,000-62,000 zone that the market has been respecting since mid-April. For traders who like to fade exhaustion and buy reclaims, this is the kind of structure that rarely goes unanswered for long.
The macro tape is mixed. AI momentum and regional risk appetite continue to underwrite Japanese equities, but Japan's 10-year government bond yield just touched a 29-year high, and a more hawkish Bank of Japan in June is no longer a fringe view. Add weak household spending into that mix and you have a market that is genuinely two-sided, which is exactly the kind of environment where mechanical price action rules earn their keep.
The Reclaim-and-Run Play on Nikkei 225
The setup we are watching is straightforward. As long as the index trades below 61,800, the short-term character is corrective. A clean four-hour close back above that pivot, ideally with rising volume, flips the bias and opens the path back toward 63,091 (recent high) and then 63,800 — the level that, per most published forecasts, would re-activate the 65,000 round-number magnet that bulls have been targeting since the start of May.
Lose the 61,000-62,000 compression box on the downside, however, and the structure changes. A daily close under 60,000 would put the 58,000 shelf into play and force the trade idea into the trash. The whole point of a price action approach here is to react to what the chart actually prints, not what we hope it will print.
Entry, Exit, Stop-Loss and Take-Profit
For a long reclaim, the cleanest trigger is the first four-hour close above 61,800 followed by a successful retest. Entries can be split: a runner on the breakout candle, the bulk on the retest. Stop-loss sits below the swing low under 61,000, which keeps risk roughly 1.2% from a 61,800 entry. The first take-profit is 63,091, where partials should reduce exposure to 30-50% of the original size. The second take-profit is 63,800, and the third trails behind a rising 50-period moving average if the move extends toward the 65,000 round number.
Position size should respect the fact that this is index futures volatility, not a calm forex pair. A reasonable rule is to risk no more than 0.75% of account equity per attempt, with two attempts maximum before the idea is shelved.
Why Automate a Nikkei 225 Price Action Setup
Reclaims fail more often than they succeed, and the failures tend to be ugly — fast wicks, partial fills, and missed retests during Tokyo open or the U.S. cash cross. A human watching this on a four-hour chart over two trading sessions will either miss the retest or fade the wrong candle. Automation removes that judgment entirely. Our Price Action Bot is designed for exactly this kind of structural pivot trade: it codes the close-above-then-retest logic, enforces the stop, and scales out at predefined R-multiples without asking the trader to override it under pressure.
Traders who prefer a trend-following frame can pair the same setup with our Trend Lines Bot, which draws and trades dynamic trendline breakouts on the same four-hour timeframe — useful as a confirmation layer once 61,800 is reclaimed and the index starts grinding toward 63,800.
Key Levels to Watch on the Nikkei 225
For the next one-to-two weeks, the levels traders should mark on the chart are: 60,000 as the line-in-the-sand support, 61,000-61,800 as the immediate compression box, 63,091 as the most recent swing high, 63,800 as the breakout trigger toward the round-number target, and 65,000 as the upside magnet. A weekly close above 63,800 historically tends to convert into follow-through, while rejection wicks at that level are the cue to lighten longs aggressively.
On the downside, a confirmed loss of 60,000 invalidates the bullish thesis and reactivates 58,000 as the next demand shelf. Anything between 60,000 and 61,800 is no-trade chop and should be sat out unless a separate strategy is actively trading that range.
Getting Started With the Setup
If you want to put this idea to work without sitting at the screen for the next ten sessions, the workflow looks like this:
1. Install the Price Action Bot on your MetaTrader 4 or 5 terminal and attach it to a JP225 chart on the four-hour timeframe.
2. Configure the bot with the 61,800 reclaim trigger, the 60,950 stop, and the 63,091 / 63,800 / 65,000 take-profit ladder described above.
3. Before going live, run the setup through our Indicators Tester against the last 12 months of Nikkei 225 data to verify the reclaim pattern's historical win rate on your specific broker feed.
4. Start with a half-size position for the first two trades to validate execution and spread behavior, then scale to full risk.
Markets do not wait for perfect setups, and a price action plan that is half-coded and half-discretionary tends to underperform either a fully automated version or a fully discretionary one. Pick a lane.
If you would like our team to help calibrate the Price Action Bot to your Nikkei 225 broker feed, or to walk through the backtest on the Indicators Tester, reach out through our contact page and we will get back to you the same business day.